Bonfire Point-Of-Sale System
Major Features:
Merchandise Categories
Hot Keys with Item Picture
Inventory Controls
Inventory Par Levels & Warnings
Amenity Sales Reporting
Add POS Bill to Reservation
Miscellaneous Merchandise
Plug N Play Hardware (Cash Drawer, Thermal Printer, Barcode Hand-Scanner)
Itemized Receipts
Item Inventory & Details Import
Requirements for Bonfire POS
Bonfire is a paid feature update. You must update your Bonfire subscription to include the POS system. Contact the Head Honcho to schedule a time to ask questions and get started. -> CLICK HERE
Bonfire POS also requires the use of a new type of Bonfire PAY merchant account.
Bonfire POS Setup
There are three major parts of the Bonfire Point-Of-Sale system: Categories, Amenities, and Inventory. All three parts are located in the Operations tab. If you have been using the Amenities tab for item sales prior to the POS update, all of your created items will show as “Uncategorized” and will not show up on the POS screen. Those items will still show on the online booking page.
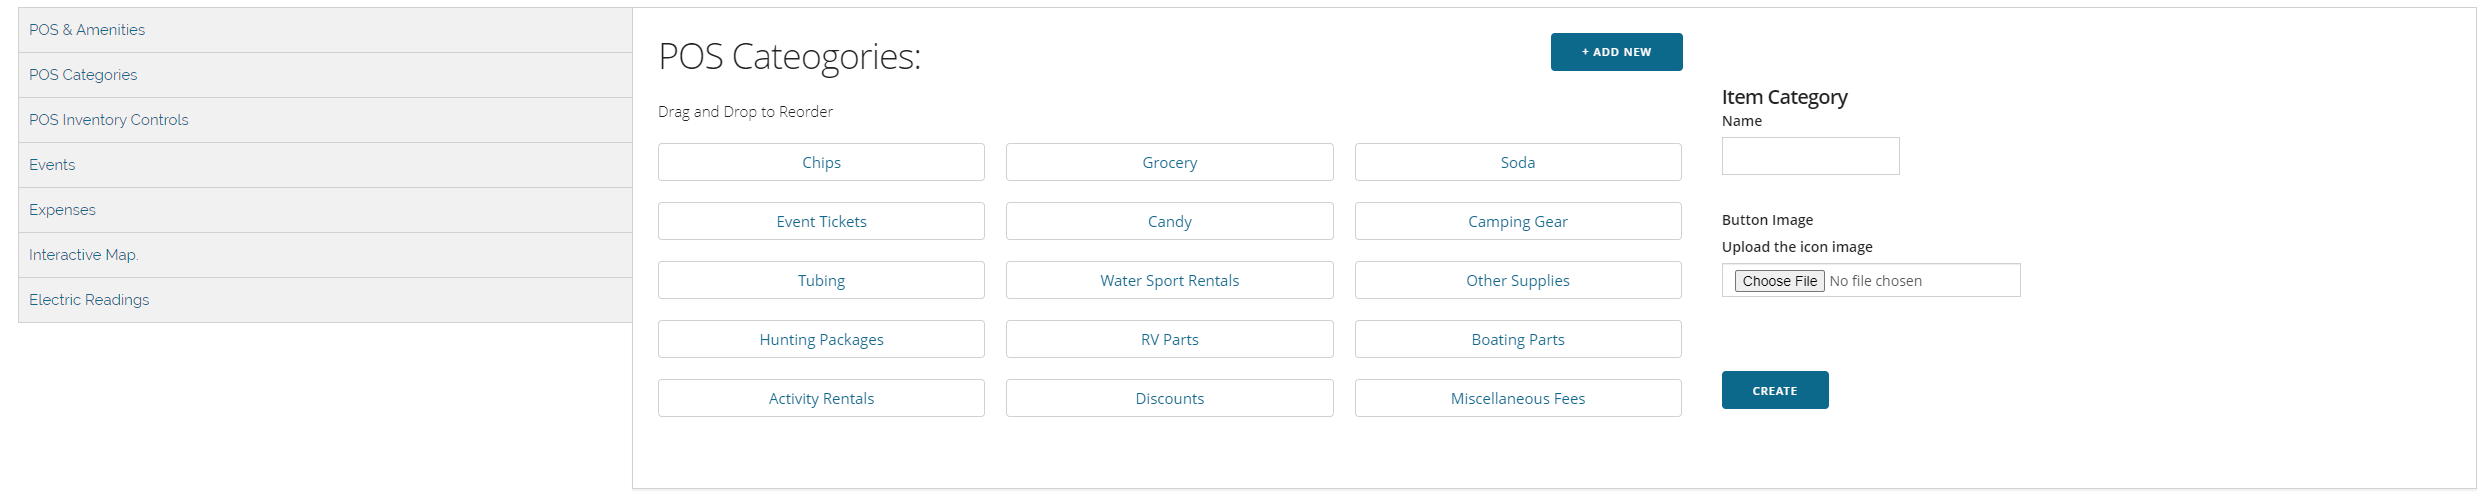
The first step to setting up your new POS system is to create item Categories. You will want to do some brainstorming about where all of your items fit in each category. If you do not assign an item to a category, it will not show up on the POS screen for use. So, at the very least, create one category that will hold all of your items. If you have a larger store, you may already have some idea about how many categories you will need and what to name them. Click on the POS Categories tab. On the form on the right hand side, fill in the Name field for the category you want to create. You can also add a picture for that category if necessary, but it isn’t required. If you do add a picture, that image will show up on the Categories column of the POS screen instead of text. Once you have created multiple categories, you can then drag and drop the boxes in the middle section to reorder them. That category order from left to right will show on the category column on the POS screen from the top down.
The next step will be to create items and amenities under the POS & Amenities tab. You have the choice to either add each item one at a time, or else use the excel template for a mass upload. The “Download Inventory” template can be found at the bottom of the Amenities tab. This template will have each category separated on a spreadsheet tab by itself. For each category page, you can add item information. Some of the details can be more complex than what you see on the form. If you need assistance, please contact Bonfire’s Customer Success Team to schedule a time to go over these details. Once you have entered the minimum information for each item within each category page, you can then upload the ENTIRE workbook into the POS & Amenities tab. This will trigger the mass creation of those items. You will still need to go back into each item to upload a picture. If you need pictures of certain items, you can simply google the item name plus “product image” and google will provide you with clear, usable product images you can download and then add to these items. You can also drag and drop the item boxes WITHIN that category to reorder those items and what order they appear on the POS screen. Later in this How-To, we will provide more explanation of the Amenity form fields.

Once your Amenities are created and assigned to a Category, you can then enter your starting Inventory. Go to the POS Inventory Controls tab. At the start, there will be no items in the middle section. On the form to the right, you will see a dropdown list of ALL the items you created on the POS & Amenities tab. Choose the item you want to add inventory to. Then add the count of pieces in your current inventory under the “Count” field. For larger stores, you can use the “In Store Location” field to identify where the user can find that stock. Once created, the item will show up in the middle section of the screen under its correct category and with its specified inventory count reflected. As you move through transactions, the inventory count of each item will decrease in real time. Whenever you receive new inventory, you can return to this screen and update your current inventory count. There is a corresponding report on the Dashboard titled “Amenities” that will show you the items sold, count sold, and revenue subtotals for each category and item during the month. Please note that Bonfire does not have any way to register or document your inventory purchases. We can only provide a count of items sold.

After these three sections have been completed, your Bonfire POS system should be ready to use.
If you have received the Bonfire POS hardware, please follow these next steps to connect it.
Bonfire Hardware Setup
Your Bonfire POS subscription includes four hardware pieces, free of charge, which are listed below. Please note that you do not have to use all the hardware pieces; ALL pieces will work with the Bonfire Simple Reservation Management System; and ALL hardware items can connect to your computer using a USB connection. USB adaptors that can be found in any electronics store.
Epson Thermal Printer - The thermal printer will provide you and your guests with a hard copy receipt of each transaction. It will show basic itemized information about the transaction including the tender type. Different tender types will show different information and/or print off a different number of receipts. Receipts are not able to be customized. If you are not using a printer with the POS system, make sure you set the printer setting in the Basic Park Settings tab of the Editor to “No Printer”. This will tell the system to not connect to the thermal printer. IF YOU ARE USING A WINDOWS OPERATING SYSTEM, it will be necessary to download a general USB driver to allow connection to the printer.
Cash Drawer - The cash drawer is a basic 16 slot cash drawer which is connected to and controlled by the printer. The printer will operate the automatic open/close mechanism prompted by the buttons on the POS screen. You can also use the cash drawer manually by using the “No Sale” key.
Zebra Hand-Scanner - For some stores, you may want/need to use the hand scanner to ring up items. To make this operation work, you will need to have the UPC barcode number entered into the UPC Code field of each item on the POS & Amenities tab. You can enter the code by placing the cursor in the UPC Code field and scanning the item barcode during setup. During regular operations, simply scan an item and it will be automatically added to the receipt bill.
Credit Card Swiper - The credit card swiper is an emulator and does not support chip, dip, or tap operations. When connected, while on the credit card payment screen, place the cursor on the “Key-Injected POS Swipe” field. Swipe the credit card thru the hardware. The field will populate with a long code of information and the other credit card information fields will disappear. Click Submit and the transaction will initiate. Without the swiper, you will need to manually enter the credit card information.
Bonfire does not provide any type of touch screen or computer screen at this time. You are responsible for providing your own computer screen for use with Bonfire POS as well as the Bonfire Simple Reservation Management System.
Amenity Fields and Information Inputs
When manually creating items and amenities for use on the POS system, the following fields are required:
Name - Name of the item should be unique to differentiate on reports and POS Hot Key screen
Hide Online - Optional if you do want this item to show on the online booking page
Amount - Enter amount in XX.XX form
Charge/Discount - One of the three radio buttons MUST be chosen or item will not be able to be used at all; Exempt/Non-Exempt refers to merchandise taxes
Category - To even show on the POS Hot Key screen, the item MUST be assigned to a category
The following fields are optional but can provide additional value to your information management process and your sales process in general.
Upload the icon image - Super helpful for organization and fast checkout operations. To find images, google the name of the item plus “product image”
Unit - Set all items for use on the POS system to “Item”
Shortkey - Enter a shorter name to allow for quick key word search on the POS screen. (Ex. Coke vs Coca-Cola)
UPC - Use the scanner to enter the UPC barcode number. During general use, scan items the guest wants to purchase and the system will add to the bill automatically
Par Level - Once the inventory count reaches this count level, the POS receipt screen will show a “Only # Left” warning for low inventory levels
The remaining fields should be kept blank and not used AT ALL when creating items and amenities for the Bonfire POS system. These fields are ONLY useful for items that show up on the online booking page. If you have an item that should show up on BOTH the online booking page and the POS screen, you MUST create two separate items with the different fields.
Note
Mandatory?
One item per reservation?
Add Option
Bonfire Point-Of-Sale Screen
The Bonfire Point-Of-Sale screen was designed to resemble a generalized restaurant or retail POS system. There are itemized receipts, taxes and totals, a category list, item hotkeys, multiple payment types, and additional function keys. There is also the Transaction History text button (as you used with the previous version). Like all things Bonfire, this screen provides a simple interface to operate your campground store.
Below are some key features located on this screen and a short description on how to use them.
Categories & Hotkeys - These keys are located in the center and right side of the screen. Their order and organization correspond to the categories and items set up in the Operations tab. Choose a Category and click on the Hotkey to add an item to the receipts area on the left of the screen.

Itemized Receipts - Located on the left side of the screen, the itemized receipts box will list all of the items added to this bill. Items will show up with the name of the item, the price per piece, multi-item controls, totals based on that quantity, and an “X” to delete that item if needed. Discounts also show up as a line item with corresponding values.

Multi-Item Controls - To quickly account and calculate for multiples of the same item, use the “+” and “-” icons to increase or decrease the quantity. The itemized receipt with adapt the calculations accordingly.

Taxes and Totals - The lower section of the left side of the screen shows the additional taxes and discount calculations resulting in a grand total for the POS bill. The POS system will add ALL merchandise taxes to Non-Exempt Charges. Exempt Charges will not have merchandise taxes added. Discounts are included in the bill BEFORE taxes.
Discounts - Discounts can be created in the POS & Amenities tab of the Operations tab. They need to be created individually, just like charges/items. They also need to be set in their own Category to show up on the POS screen.

Search Bar - By default when you click on the POS top navigation tab, the cursor will show within the Search Bar located below the Category & Hotkey box on the right of the screen. In this field you can type a Shortkey, UPC barcode, or name of an item to filter your Hotkey choices and find a specific item. If you have the hand scanner connected to your computer, and you have the UPC barcode number in the item information, you can simply scan the barcode of an item and it will look up the item and add it to the itemized receipt.
Add to Res - The “Add to Res” button stands for “Add to Reservation”. You can add the current POS itemized receipt transaction to any CHECKED-IN reservation. The total charge and the itemized receipt is added to the checked-in reservation under the Charges box of the reservation and the total charges due on the reservation is updated. The guest can pay for that POS bill when they pay for the balance due on their reservation. You can ONLY add the POS bill to a CHECKED-IN RESERVATION.

Cash/Check/Credit - Use these traditional methods of payment for general transactions. YOU CANNOT SAVE A CREDIT CARD VIA THE POS SCREEN. Saved cards are only possible using the reservation screen.
No Sale/Print - No Sale will open the cash drawer without any transaction. The cash drawer is operated by the printer and must be connected to the printer for this feature to work. You can also open the cash drawer using the keys provided with the hardware. The Print button will print out the current transaction on the Itemized Receipt box.

Add Misc Merch - For general merchandise or variable pricing merchandise like items sold in gallon increments or revenue collected from coin operated machines, you can add this revenue and record this variable transaction using the “Add Misc Merch” button. When you click this button, it will take you to the form. Input a name for this item that you can readily recognize and identify. Input the $ amount and any notes you would like to record. Then click “Add to Bill”. The system will then add that random item to the Itemized Receipt to include in the total transaction. Follow general transaction instructions to complete the receipt of these items.
Amenities Report
The Amenities report will provide you with the number and value of amenities sold during monthly increments. In order for the Amenities report to be accurate, you need to ensure you are using distinct names for each item. If you use generalized names, even when the report accounts for the sale, you may be confused because the naming it too similar.
You can choose to generate an Amenities Report based on monthly presets. All items sold during those monthly date ranges will be reported for their respective months. Below are the details that the Amenities Report will show:
Month/Year - Displays the month/year by section
Category & Item Name - The Category will highlight the section followed by a list of item names in separate rows. Each item has its own row.

Items Sold - Shows the number of that specific item sold during that month/year
Subtotal - Shows the calculation of the quantity multiplied by the price of a single item.
All reports are exportable into .pdf or .csv formats.